- Story and recipes by Chef Heidi Fink Photography by Don Denton
Story courtesy of Boulevard Magazine, a Black Press Media publication
Like Boulevard Magazine on Facebook and follow them on Instagram
There’s nothing like a blustery evening paired with a warm pan of crisp-fried pierogi, especially if you have pulled those morsels of deliciousness from your homemade stash in the freezer.
Although it may seem like a daunting task, homemade pierogi are one of the most satisfying and delicious things a cook can make. The tender, pillowy, homemade dough, the perfect amount of flavourful filling, the crisp buttery crackle as you bite into it — homemade pierogi are transformational, and ever so much better than store-bought.
I make pierogi from scratch in the winter months, when I want to eat foods that are cosy, hearty and richly flavoured. It’s a special project for our family around Christmastime, but the joy can last all winter long. There’s nothing like a blustery evening paired with a warm pan of crisp-fried pierogi, especially if you have pulled those morsels of deliciousness from your homemade stash in the freezer!
Homemade pierogi are a project, but one that is uncomplicated and absolutely worthwhile. The process of filling and sealing them gets quicker and easier, until it becomes a kind of kitchen meditation. I love to try out different fillings, branching out from the traditional cheese-and-potato (still my kids’ favourite, let’s be honest) to a variety of winter vegetables, aromatics, cheeses, meats and even sweet fruit fillings. Think sautéed mushroom, kielbasa sausage, roasted squash with buttery leeks, or spiced apple. No matter which filling you pick, wrapping it in dough is going to elevate it from tasty to extraordinary.
The importance of a tender yet resilient dough cannot be overstated, and I have, after years of trial and error, finally found the perfect pierogi dough and have shared it below, along with a few of my favourite fillings. In addition, I’ve shared as many of my tips and tricks I can think of to make your pierogi-making venture a success.
I urge you to try your hand at homemade pierogi. I dare you not to love them as much as I do.
BEST PIEROGI DOUGH
After years of trying one recipe and another (most from Polish or Ukrainian grandmothers famous for their cooking) and never feeling quite satisfied, I finally stumbled on the original of this one on the King Arthur Flour website. Oh, the joys of the internet!
I have adapted it a bit, but all credit for this perfect, tender, pillowy-yet-strong pierogi dough must go to them.
4 cups unbleached all-purpose flour
1 tsp salt
2 large eggs
1 cup sour cream
½ cup room-temperature butter
In a medium bowl, mix together the flour and salt. In a separate bowl, beat together the egg and sour cream until smooth.
Add the egg mixture to the flour mixture, along with the room-temperature butter. Mix well with a spoon until a rough dough comes together. It will be very sticky. You can do this beginning step in a food processor, but the dough will still need to be kneaded by hand.
Turn the dough (with any unmixed dry flour) onto a countertop and knead without adding additional flour until the dough is smooth, silky and not sticky. This will take at least five full minutes. You can knead longer, if you wish — it can’t be over-kneaded.
Divide the dough into 4 portions. Wrap each portion well in plastic wrap and refrigerate for at least 1 hour, and up to 48 hours.
FILLINGS:
The following four recipes are only a small sample of the types of fillings you can make for pierogi. The homemade filling is almost the best part of making these yourself. You can use any combination of vegetable, meat, dairy and aromatics that you like, as long as the resulting filling isn’t too wet and sloppy. Let your imagination run wild. You can even make sweet pierogi with fruit filings! All fillings can be made up to four days in advance of making the pierogi. Keep in the refrigerator until ready to use.
WINTER SQUASH, LEEK & GOUDA
This is my all-time favourite pierogi filling. The combination of sweet, earthy squash with tender buttery sautéed leeks and grated cheese is a dream inside a dumpling.
NOTE: It’s very important to use either kabocha squash or buttercup squash. These dark-green-skinned squash have a very dry and dense flesh, which provides a great consistency in the filling. Other squashes and sweet potatoes taste good, but make wet fillings that are difficult to work with.
2 lbs kabocha or buttercup squash (3 cups diced)
1 large or 2 medium leeks, white and light green parts (3 cups sliced)
¼ cup butter
¾ tsp salt
1 Tbsp butter (additional)
2 cups grated gouda cheese
Using a big sharp knife, cut the squash in half through the stem. Use a spoon to scoop out the seeds and membranes. Cut the squash into wedges. Lay each wedge on its side and cut the peel off. Discard the peels, seeds and membranes. Cut the squash into 1-inch cubes. Place in a steam basket and steam over boiling water for about 15 minutes, until fork-tender.
Meanwhile, slice and clean the leeks. Sauté the leeks gently in ¼ cup butter until softened. Remove from heat.
When the squash is ready, remove it to a bowl. Add the salt and the additional 1 Tbsp of butter. Mash with a fork or potato masher until relatively smooth. Stir in the leeks and grated gouda. Taste for seasoning — it may need more salt.
Let filling cool completely before filling pierogi.
INDIAN-SPICED POTATO & PEA
A riff on samosa filling, this is a winner with everyone who has tried it. This filling is especially tasty when the pierogi are pan-fried — the combination of crisp dough, curry spices and the sweet pop of the peas is wonderful.
BONUS: You can use this recipe as a side dish with any meal.
2 large russet potatoes (about 1-1/2 lbs)
¼ tsp salt
4 Tbsp oil
½ tsp cumin seed
2 shallots, diced fine
1 Tbsp minced ginger
½ jalapeno, seeded and minced
1¼ tsp garam masala
¼ tsp turmeric
½ tsp coriander
½ tsp salt (additional)
2 ripe Roma tomatoes, chopped
3 Tbsp water
1 cup frozen baby peas, rinsed in warm water to thaw
¼ cup chopped cilantro
Peel, rinse and dice potatoes into ¾-inch cubes. Place in a small pot, cover with water and add the ¼ tsp salt. Bring to a boil, reduce heat, cover and simmer gently for about 10 minutes, until tender. Drain potatoes and transfer to a tray where they can evaporate excess steam.
In the meantime, heat oil in a medium-large sauté pan over medium heat. Add cumin seeds and let them sizzle for a few seconds, then add the shallots. Sauté for 2 or 3 minutes, stirring frequently, until shallots have softened. Reduce heat to medium-low. Add the ginger and jalapeno and sauté until fragrant, about 20 seconds. Add the all the spices and the salt, stir a few times, then add the tomatoes along with the water. Cook for 3 to 5 minutes, stirring occasionally, until tomatoes have broken down into a sauce and everything smells delicious.
Add the cooked potatoes and stir until everything is well mixed. Keep cooking and stirring for a minute or two until all the flavours are blended together.
Remove to a bowl, stir in the peas and cilantro. Taste to adjust the salt levels.
TRADITIONAL MUSHROOM & SAUERKRAUT
This is the most traditional filling in this lineup, but one of the standouts. I like to sauté the mushrooms until they are caramelized and “meaty” tasting, and then mix just enough chopped sauerkraut to give the filling a tangy, salty zing.
1 lb brown mushrooms
¼ cup butter
½ tsp salt
¼ tsp freshly ground black pepper
1 cup packed sauerkraut, drained and chopped
To clean mushrooms, I put them in a large bowl and run cold water over them, swish them around, and pull the mushrooms out into a colander, letting the dirt settle into the bottom of the washing bowl. After cleaning, mince the mushrooms until they are quite small — I find it best to use a food processor for this step.
Next, place a large sauté pan over medium heat and add the butter to the pan. Once the butter is melted, add all of the minced mushrooms, along with the salt and pepper. Sauté for several minutes, until the mushrooms are giving off liquid. Turn the heat down to medium-low and continue sautéing, stirring occasionally, until all the liquid has evaporated, the mushrooms are getting some dark colour on them and the aroma of browned mushrooms is filling the room. Remove from heat and scrape mushrooms into a bowl. Let cool completely.
Meanwhile, drain and chop the sauerkraut. When the mushrooms are cool, mix the sauerkraut into the bowl. Taste to adjust the seasoning.
COTTAGE CHEESE, SPINACH & HERBS
Cottage cheese is a very traditional pierogi filling. But jazz it up with steamed spinach, sautéed green onions and piles of herbs, and you get a fresh twist on a classic!
2 cups cottage cheese, drained if very wet
10 oz spinach (boxed or bagged spinach is great)
½ tsp salt
¼ tsp freshly ground black pepper
tsp freshly grated nutmeg
¼ cup butter
1 bunch green onions (6 to 8), sliced — use both the white and green parts
½ cup minced EACH of fresh parsley and fresh dill
Place the cottage cheese in a bowl. Mash with a back of a fork until some of the cheese has broken down and the curds have binded together a bit.
Place the spinach in a large pot with a lid and about ½ cup water. Cover and bring to a boil. Immediately remove from heat and let stand for 1 minute. Using tongs, remove spinach to a plate to cool. Once it is properly cool, pick up handfuls of cooked spinach and squeeze to rid them of excess water. When all the spinach has been squeezed, chop it finely with a knife and add it to the bowl with the cottage cheese. Add the salt, pepper and nutmeg.
Heat a sauté pan over medium heat. Add the butter and let it melt. Add the prepared green onions and sauté for 1 minute, until softened. Scrape into the bowl with the spinach and cheese. Add the parsley and dill. Mix everything very well. Taste to adjust seasoning.
TO ROLL AND FILL PEIROGI
Roll each portion of dough on a lightly floured counter, turning and flipping the dough as necessary, adding a little more flour as necessary, until the dough is very thin, about 1 millimetre thick. Don’t worry if the dough appears too thin; it’s very stretchy and shrinks back on itself somewhat. It’s better if the dough starts off looking too thin.
Use a 3-inch-round biscuit cutter to cut rounds of dough, cutting as close together as possible to avoid wasting any of it. Remove the excess dough from around the cut circles.
Have a small bowl of water on the counter beside the dough circles. Have a parchment-lined tray ready as well. Place approximately 2 tsps of filling in the middle of each circle of dough. Dip your finger in the bowl of water and run your wet finger along half the edge of 3 or 4 circles of the dough (just work with a few at a time, otherwise they get too sticky).
The most common instruction is to fold the dough in half over the filling, but this often leads to the filling squishing out and wrecking the seal. I think it’s better to place a filled round of dough in your non-dominant hand and use your fingers to pull the dough around the filling in a semi-circle (and sometimes you need to push the filling in a bit) and pinch the two sides of the dough together. Pinch firmly the whole way around, making sure no filling is in the way. For beginners, I would also recommend sealing the edge of the pierogi with the tines of a fork, but you can do this once all the pierogi are filled and sealed.
Transfer the filled pierogi to the parchment-lined tray. Continue folding and sealing until all the pierogi are done.
I always freeze mine right away, on the tray, until firm, before transferring them to a zipper-lock bag. They can be cooked directly from frozen.
TO COOK AND SERVE PIEROGI
Bring a large pot of salted water to a boil. Drop in no more than 18 pierogi at a time; boil until all pierogi float to the surface and the dough becomes somewhat translucent — 3 to 5 minutes. In the meantime, have a large tray ready in a low oven (200 F) with about ¼ cup butter melted on its surface.
Once the pierogi are cooked, turn off the heat under the pot. Remove the pierogi in batches with a slotted spoon, making sure to let as much of the excess water drip off as possible, and place pierogi on the melted butter tray in the warm oven. Repeat until all pierogi are removed to the oven. (I’ve started using this method in an effort to prevent the cooked periogi from sticking together until they have all been fried.)
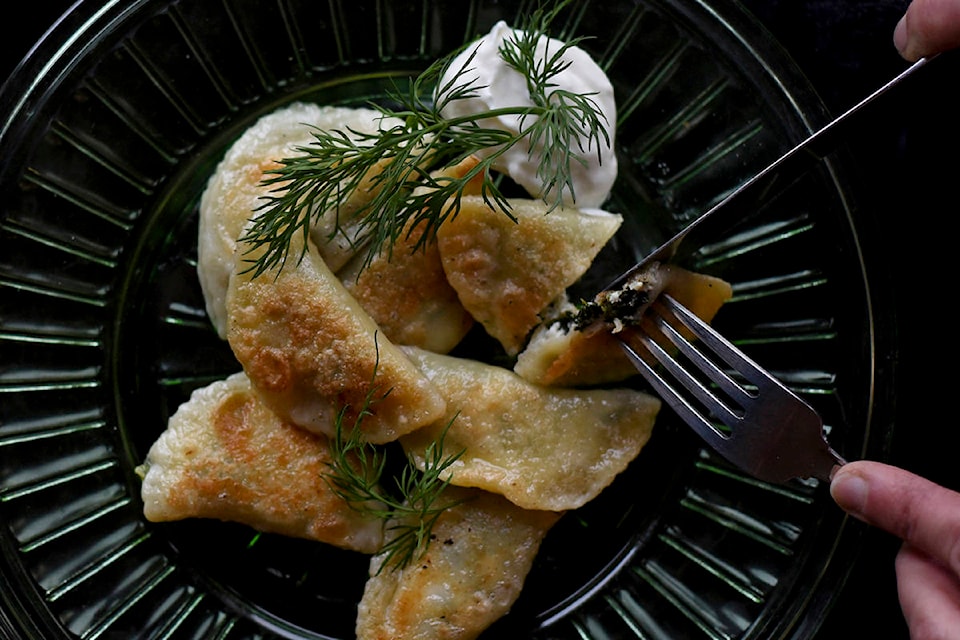
You can eat the pierogi like that, or you can pan-fry them in butter until both sides are crisp. It’s most common to serve pierogi with sautéed onion and sour cream.